
English
Marvelous Designer sets the standard for 3D garment simulation. For in-house teams at apparel brands, that is not the whole job. To ship a collection, you need a connected workflow around it: auto tech pack generation, fit validation across sizes, moodboard alignment to protect creative intent, and factory-ready outputs that merchandising and production can use without rework.
What to add: an orchestration layer that turns approved Marvelous Designer files into spec sheets, BOMs, graded measurements, and vendor exports, and that also anchors design to creative direction and line goals. This post breaks down how to pair Marvelous Designer with The F* Word so your team can move from 3D prototypes to production-grade packages on calendar.
Marvelous Designer is strong where fabric behavior and silhouette matter most. It gives design, tech design, and pattern teams a shared 3D space to test ideas before committing to costly samples. Three areas stand out for in-house work: 3D fit, virtual sampling, and fabric simulation.
First, 3D fit. Marvelous Designer lets you drape pattern pieces on avatars with realistic proportions and posture. You can apply tension maps, view pressure points, and read how stress distributes around biceps, seat, and waist. That matters during fit sessions, because the team can check pitch, ease, and balance line before cutting fabric. You can spot back neck drop on a hoodie, see if the thigh is pinching on a tapered jogger, or catch zipper waviness on a bomber front. Those early checks reduce sample rounds. Designers can test pocket placements and adjust yoke shaping, while tech design can call out adjustments in centimeters against a reference measurement table.
Second, virtual sampling. Most brands are trying to cut the first proto or SMS count without losing design intent. Marvelous Designer helps by letting teams iterate on neckline depth, hem finishes, collar stands, and volume quickly. You can compare two collar roll shapes side by side, or test if a rib cuff spec at 8 cm double fold pulls the sleeve cap. When merch asks for an added colorway or a variant sleeve, the team can clone and edit, render a handful of angles, and hold a design review with visuals that are close to how the garment will behave. This supports faster decision cycles and less time waiting on fabric to arrive.
Third, fabric simulation. The software includes physically based parameters that let you dial in stretch, bending, and shear to approximate denim, poplin, bias cut silk, or a nylon shell. You can assign textures, normal maps, and opacity where relevant, like mesh panels or laser cut overlays. That gives designers and color teams a truer picture of how a pleat opens on a crepe, how a down baffle compresses, or how a bias cut hem falls. It also helps pattern teams predict where to add ease or change seam types, for example moving from 301 lockstitch to 504 overlock on a knit where needed. The physics are not a perfect mirror of every mill's fabric, but they are close enough to drive fewer surprises in first fit.
For in-house teams, these strengths translate to better early calls in sample reviews. You can arrive at proto with clearer pocket sizes, closer stripe matching plans, and construction ideas already baked. Merch gets a cleaner view of silhouette and proportion. Creative direction can see which themes hold up once the garment is draped. That is why Marvelous Designer has become standard kit inside design organizations that take 3D seriously.
Marvelous Designer is not a production tool by itself. It is excellent at simulating garments and editing patterns, but in-house teams run into limits when it is time to hand a style to merchandising, production, and vendors. Four gaps come up on nearly every brand calendar: tech pack generation, moodboard validation, merchandising handoff, and factory-ready outputs.
No tech pack generation. Marvelous Designer does not build specification sheets, measurement tables, graded rules, or BOMs that match vendor expectations. You can export patterns and render images, but you still need to compose a tech pack with callouts, stitch and seam references, labeling locations, trims, and packaging instructions. Many teams paste screenshots and hand-enter numbers into PLM or a design ops folder. That invites mistakes. Notches get missed, seam allowances are inconsistent, and construction notes get lost between design, tech design, and production. When a change is made in 3D, the pack is already out of sync unless someone updates it manually.
No moodboard validation. Creative direction sets the season's themes, color stories, and silhouette guardrails. Marvelous Designer does not check if the garment you just simulated aligns with the line plan or approved moodboards. Teams end up reviewing late in the process with merch or creative leads, only to find that neckline shapes drifted from the brief or trim language does not match. That creates churn, extra edits, and missed calendar dates for SMS or lookbook shoots. Without validation, a 3D file can look great yet still fail a creative review.
No merchandising handoff. Merchandising needs clear style records with SKUs, options, and target FOB. They also need accurate images for line reviews and digital assortments. Marvelous Designer can render views, but it does not package them into a format merch can use across categories. There is no automatic colorway matrix, no price tier annotations, no alignment to buy quantities by store tier or channel. Someone has to export images, rename them, insert them into presentation templates, and reconcile what is in design against what the merch buy expects. When SKU plans shift, file management becomes a time sink.
No factory-ready outputs. Vendors want DXF AAMA or ASTM with layer structure and seam allowance rules, PDF pattern sets with correct scale and drill holes, graded size nests, and a clear measurement table. Many also ask for 3D assets in GLB or FBX for their internal review or for digital showrooms. Marvelous Designer can get you OBJ, FBX, and pattern data, but you still need to prepare files to vendor standards, add labels, and confirm tolerances. Production teams end up cleaning files in separate CAD tools, reconciling BOM codes in PLM, and fielding questions from factories when line art or construction notes are missing. Any mismatch creates sampling delays and fit issues that carry into SMS or PP.
Beyond those four, in-house teams also hit friction on version control and approvals. Marvelous Designer saves files, but a brand needs naming standards, approvals by status, and a way to lock a style once merch signs off. Fit comments from live sessions need to tie back to the 3D version that was reviewed. Fabric codes and lab dip approvals need to sync to the current BOM. Colorway renders should line up with Pantone or mill codes, not just hex values. None of that lives inside Marvelous Designer. Teams stitch together spreadsheets, folders, and PLM records, which increases cross-checking and the chance of sending the wrong file to a factory.
All of this is fixable, but not inside the simulation tool alone. You need a layer that turns your 3D truth into production truth without copy paste or reentry. That is where orchestration comes in.
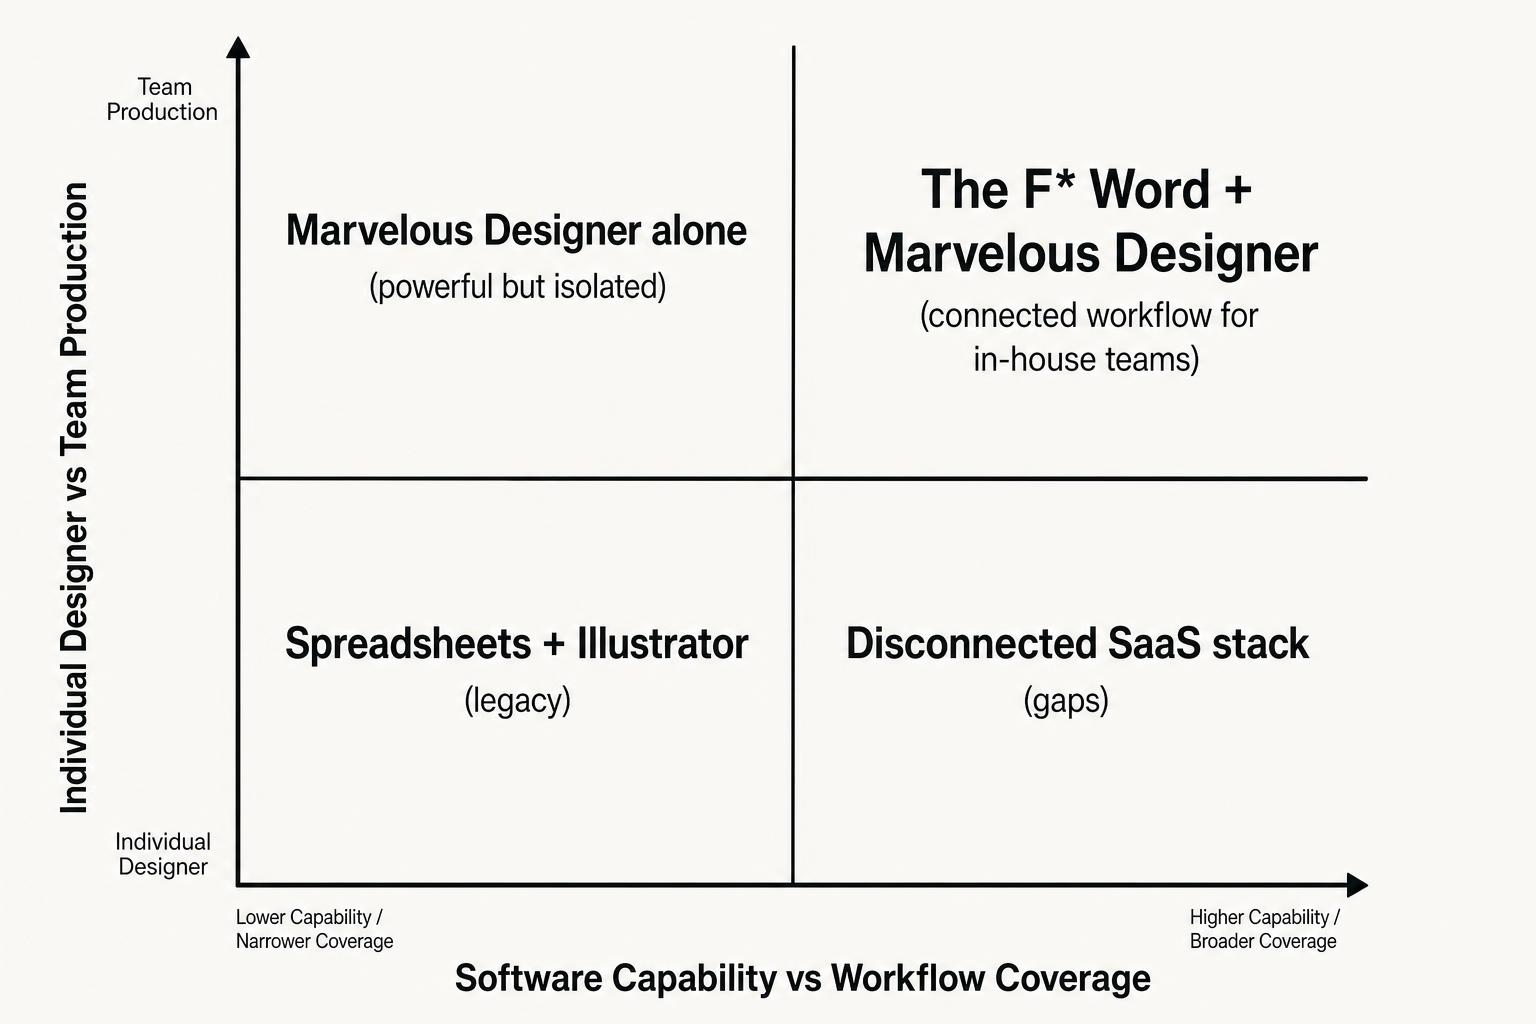
Where in-house design teams hit the wall: Marvelous Designer alone covers software, not workflow.
Gap quadrant chart: high visual accuracy, low production readiness. Marvelous Designer excels on drape and fit, but without tech packs, moodboard checks, and vendor exports, teams stay in the top left quadrant. The goal is to move to high visual accuracy and high production readiness.
Your team needs an orchestration layer that sits next to Marvelous Designer, reads approved 3D files, and outputs everything the brand and factory require. This is not another modeling tool. It is the connective thread that converts draped garments into clear specs, checks against creative direction, and generates files merch and vendors will actually use.
Auto tech pack generation from approved 3D files. Once a garment is approved in Marvelous Designer, the orchestration layer should pull pattern geometry, seam lines, and material assignments. From there, it should generate a full tech pack: measurement tables by size with tolerances, graded rules if you provide grading inputs, seam and stitch callouts with ISO codes, BOM with fabric, trims, labels, and packaging, plus construction notes tied to pattern pieces. It should output vector line art from your 3D patterns, clean callout numbers, and labeled notches and drill holes. When you adjust the 3D pattern or change a seam allowance, the pack should update without someone rebuilding it slide by slide.
Moodboard to spec validation. Creative direction and merchandising want guardrails to hold. The orchestration layer should ingest season moodboards, color stories, and silhouette rules, then compare your 3D garment against them. If the brief calls for square shoulders and a boxy body, it should flag if your current shoulder slope or sweep drives a different line. If trims are limited to gunmetal and matte black, it should note that the zipper pull in your 3D file is polished nickel. If a pattern piece adds more than the allowed panels for cost targets, it should call that out. This keeps you honest before review, reduces back and forth in line meetings, and protects the intent set by creative leads.
Factory-ready exports. Vendors need the right files, not just pretty renders. The orchestration layer should export DXF AAMA or ASTM with correct layers and seam allowances, PDF pattern sets with scale bars and punch marks, GLB or FBX for 3D reference, and XLSX or CSV for measurements. It should attach the BOM with mill and trim codes, care label instructions, and packaging specs. It should include construction pages that show stitch types and images pulled from the 3D garment with clear callouts. Finally, it should publish everything to a vendor portal or link to your PLM, so production can send one link per style instead of hunting through folders.
This is the role The F* Word fills for brands. The F* Word acts as the orchestration layer for Marvelous Designer work. It reads approved 3D files, auto builds tech packs, and generates moodboards that align to your creative direction. It can check fit notes against your measurement tables, produce size run measurement sheets, and push factory-ready exports in one click. Because it uses your brand libraries for fabrics, trims, and stitch standards, it writes BOM lines with the exact codes your vendors expect. It saves renders into your line review templates and names files using your internal naming rules, so merch does not need to repackage anything.
For teams who already run PLM, The F* Word connects outputs to existing records. If you do not have PLM, it still handles version control, approvals, and vendor release. In both setups, the net effect is the same: Marvelous Designer stays the place where you design and drape, and The F* Word becomes the place where a style becomes production ready, with no extra spreadsheets or slide decks to maintain.
Here is a quick view of what each tool does inside an in-house design workflow. Marvelous Designer handles 3D garment creation and simulation. The F* Word handles orchestration, documentation, and vendor outputs.

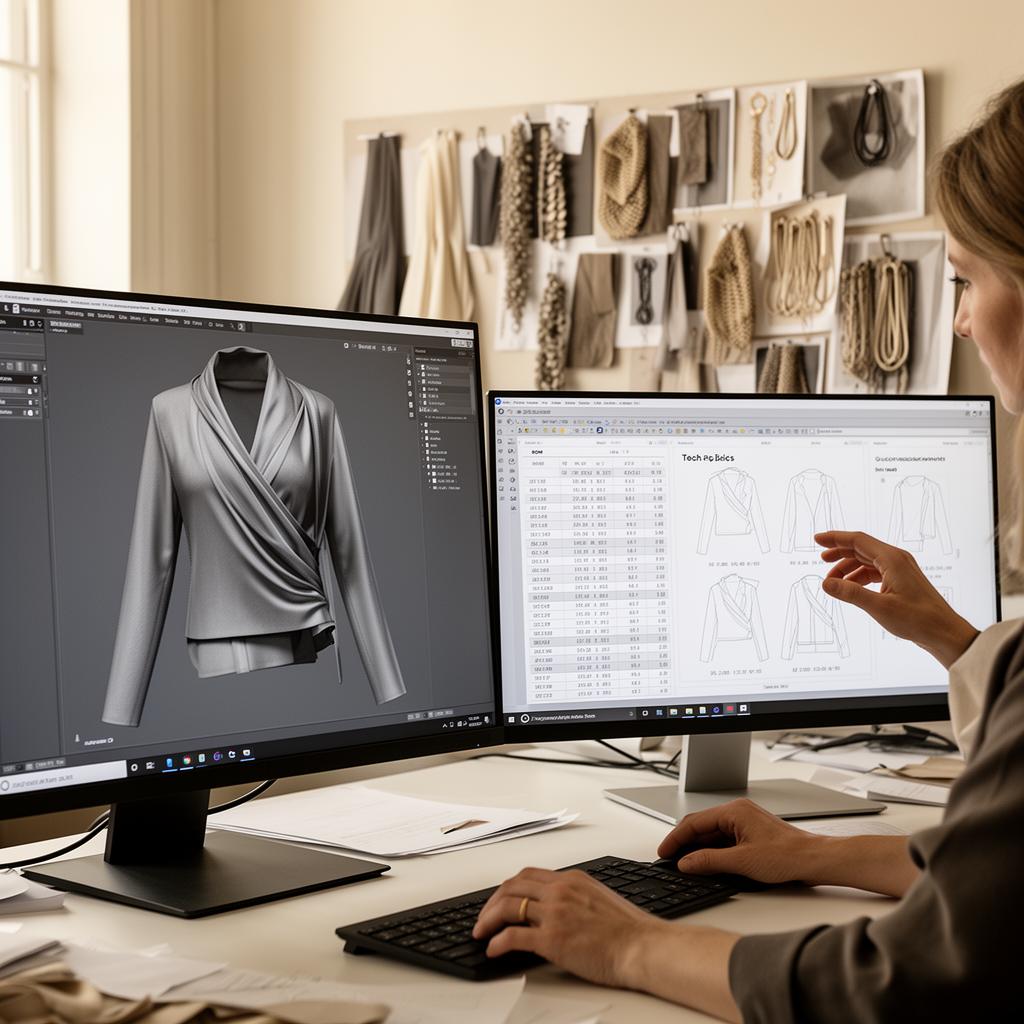
A connected workspace: 3D simulation on the left, auto-generated tech pack and fit data on the right.
Connected workspace: Marvelous Designer for creation, The F* Word for approvals, moodboards, tech packs, and vendor exports. One hub where design, merch, and production work from the same source of truth.
Rolling out Marvelous Designer with The F* Word is less about software menus and more about process. You are pairing creation and orchestration, so plan for habits, handoffs, and calendars. The four-step approach below reflects what works with independent and mid-market brands that have to hit sell-in and photoshoot dates without adding headcount.
Step 1 - Pilot. Pick one category for the first cycle, two if you have a small line. Jackets, knit tops, or dresses all work. Choose 6 to 10 styles that matter to the line. Identify a design lead, a tech design lead, and a design ops owner. Build a small fabric and trim library inside Marvelous Designer that matches your mills and code system. In The F* Word, load your season moodboards, silhouette guardrails, and BOM code lists. Agree on naming conventions for styles, renders, and files. Run two sprints: first for silhouette exploration in Marvelous Designer, second for spec finalization and tech pack auto generation in The F* Word. Hold weekly standups with design, tech design, merch, and production to review outputs against line goals.
Step 2 - Integrate. Connect The F* Word to your PLM or, if you do not have PLM, set up vendors with access to view final packs. Create templates for measurement tables per block. Define which approvals gate auto generation. For example, silhouette lock in Marvelous Designer triggers draft pack, then tech fit lock triggers vendor export. Map file formats to each vendor. Some factories want DXF AAMA, others accept PDF and GLB. Set up your catalog of stitch types and seam finishes, with images that The F* Word can reuse across packs. Add your color library with Pantone and mill codes so colorway renders map to real materials, not just swatches on screen.
Step 3 - Scale. Expand to more categories once the pilot ships. Train designers on a short list of Marvelous Designer standards: avatar sizing, collision thickness, seam allowance defaults, and render angles that merch prefers. Train tech design on how to adjust measurement rules in The F* Word and how to review auto callouts before vendor release. Make a simple QA checklist: notches match, drill holes placed, zipper length accurate, label placement pictured, care content coded, packaging spec attached. Add a routing rule so any change in Marvelous Designer after merch signoff triggers a new version in The F* Word with a compare view. That protects against last minute edits slipping past production.
Step 4 - Measure. Track cycle time from first 3D drape to vendor pack release. Track number of physical protos per style before SMS and PP. Track fit issues caught in 3D that do not reappear in first proto. Track merch satisfaction with renders for line reviews, and vendor request rates for missing info. Most brands see physical sample reductions and faster handoffs within 6 to 10 weeks once habits set. Publish a one-page scorecard each milestone: percent of styles using Marvelous Designer, percent of packs auto generated by The F* Word, percent of vendor releases on the planned date. Use that to tune templates and libraries, not to blame teams.
Keep rollouts practical. Start with the category that owns the highest sample count or the most timeline risk. Give teams gridlines they can follow. Designers keep working in Marvelous Designer the way they already do, just with a few standards. The orchestration layer takes the tedium out of documentation, catches drift from creative direction, and gives production and vendors the right files the first time.
No. It is excellent for 3D fit and design iteration, but it does not create full tech packs, validate against creative direction or merch plans, or export factory-ready packages with BOM codes, construction pages, and measurement tables. You need an orchestration layer to turn 3D garments into vendor-ready documentation.
No. Keep Marvelous Designer for 3D creation and fit checks. Add The F* Word next to it to generate moodboards, auto build tech packs, and publish vendor exports. The goal is to pair a strong simulation tool with a strong orchestration layer, not swap tools.
Pricing depends on team size and the volume of styles you push through each season. Most independent and mid-market brands outfit design, tech design, and design ops with access, then provide vendor view seats. The F* Word is priced to replace manual tech pack labor, duplicative slide decks, and file prep hours for factories. Request a demo for an exact quote based on your categories and calendar.
Most teams can run a focused pilot in 4 weeks, then scale across categories within 6 to 10 weeks. Timelines depend on how quickly you can stand up fabric and trim libraries, set naming standards, and agree on approval gates. The software goes in fast. The calendar impact comes from process clarity and template reuse.
This approach fits independent and mid-market brands that run real calendars and vendor handoffs. If your team designs and ships multiple drops or seasons per year, and you care about reducing sample rounds and hitting buy meetings, pairing Marvelous Designer with The F* Word makes sense. Enterprise brands use similar patterns at larger scale, but you do not need a global team to see gains.
Ready to move from 3D prototypes to factory-ready packs without extra headcount?
Related: marvelous designer enterprise
Get The F* Word workflow insights in your inbox.